Game Engine 0 to 1 (01): It Starts Now
[01] It Starts Now
“If you truly expect something to be difficult, it will be.”
— Peter A. Cohen
DungineX 目前还在开发中,你可以在这里查看当前的开发任务列表:DungineX TODO。
你可以在 Game Engine 0 to 1 标签下浏览该系列的所有文章。
Think Twice
在开始创建我们的项目前,还是应该停下来思考一个问题:我们希望如何组织我们的代码?这一问题其实隐含了许多小问题,下面简单列出一些,不过暂时还不太涉及到代码层面的设计。
- 我们使用什么工具进行项目管理?MS Solution 还是 CMake,或是其他?
- 我们如何对文件进行布局,怎样管理第三方依赖?
- 最终 DungineX 的形态是怎样的?
这些问题其实很大程度上取决于个人的偏好,这里给出我个人的回答,以及相应的理由。
对于项目管理方式,即 Build System,这里选择 CMake。虽然对于 C++ 来说,并没有一个标准的项目管理工具,但是 CMake 已经是 C++ 的 de-facto standard 了。而且我们的依赖,例如 SDL 等,也都是用 CMake 进行管理,因此集成成本会相对较低。此外,现代的 IDE 对 CMake 的支持也都十分完善,所以使用起来也不会很困难。
在确定使用 CMake 后,其实也就很好回答第二个问题了,我们只需要按照经典的 CMake 项目结构进行组织即可。当然,这里也会有个人偏好的存在。我们需要有我们的 DungineX 以及第三方依赖,此外,我们还想有单元测试以及 Demo。所以基本的目录结构也就是这些,我们只需要组织整齐即可。
最后,我们 DungineX 如何发布?对于游戏引擎,自然就不能是我们常见的可执行文件了,而是用静态或动态链接库的形式,因此我们还需要考虑库的编写。
当然,这些不是想想就能得出结果的,还需要一定的经验积累。不幸的是,经验积累并不能简单的通过文字表述出来,所以,就让我们直接开始吧。
Let the Fun Begin!
创建 CMake 项目
This is the official tutorial video from SDL3: How to setup SDL3 as a git submodule with Modern CMake.
我们刚刚已经讨论过了项目的基本结构,因此这里我们可以直接创建具体的文件夹。同时,我们使用 Git 进行版本控制,为了减小仓库的大小,一个比较标准的做法是将对应依赖作为 submodule,这里我们把它们都注册到 Vendor 目录下。这里有一个依赖我们之前没有提到,是 spdlog,用作之后的日志输出。

具体 CMake 的一些编写就不再赘述了,可以直接参考仓库中的源码。
这里我使用的是 Visual Studio + Resharper 的开发环境。当然 Visual Studio Code 同样可以安装相关插件获得 CMake 支持。
这里我想重点讨论的,是如何让这个 CMake 项目看起来更加专业。当然,也有一些小技巧。
Git submodule
对于 C/C++ 这种缺少统一包管理的语言来说,将依赖作为 submodule 是一个不错的选择,从而能够进行统一的构建。
具体地,我们可以通过如下的命令为 Git 仓库添加一个 submodule,如果不提供 path,则默认添加到项目根目录。
1 | git submodule add url [path] |
当我们要更新依赖时,可以简单的用下面的命令。
1 | git submodule update --init --recursive |
需要注意的是,由于 SDL 的仓库很大,所以你可能需要一个稍微稳定的网络连接。
第三方依赖管理
为了使用 SDL 的更多功能,例如加载字体、图片等,我们还需要引入一些额外的 SDL 组件。对于字体支持,我们需要 SDL_ttf,而对于图片加载,我们需要 SDL_image。当然,SDL 还有音频支持,不过作为游戏引擎,之前提到的 FMOD 是一个相对更专业的库。由于暂时我们还不涉及音频的处理,这部分内容会在之后进行介绍。
当第三方库多起来时,链接它们就显得有些麻烦。每当添加一个依赖,不仅要改动 Vender/ 下的 CMakeLists.txt,还要改动 DungineX/ 里的 CMakeLists.txt。对此,我们可以将依赖全部依赖首先打包成一个 interface 类型的目标,作为所有第三方依赖的链接。具体这一目标的创建方式如下,更详细的内容可参考具体的 Vendor/CMakeLists.txt。
1 | target_link_libraries(DgeX_Vendor INTERFACE |
这里需要注意的是,必须首先使用 add_subdirectory(SDL) 添加 SDL 依赖,才能确保 SDL_ttf 和 SDL_image 能够获取正确的配置。但是在添加依赖时,SDL3::SDL3 必须是最后一个。
这里,细心的你可能注意到,我们链接的第三方库都是 XX::XX 的格式。这其实是目标别名(Target Alias),可以更方便地管理依赖,并且让我们的 CMake 项目更加高级。关于这一点,会在稍后具体介绍。
更好的 CMake 项目结构
更多 CMake 技巧的介绍可以参考 Modern C++ Project With CMake。当然,DungineX 全部都使用到了。
当然,如果你也一样,对项目结构有一定的“强迫症”,那你可能需要多花一些时间整理你的项目。比如,你希望添加一个 utils.cmake 包含一些自定义的函数,或者增加单元测试目录,又或是想在 CMakeLists.txt 添加一些选项或者注释。
Minimal DungineX
Now, let’s implement a minimal library, so that we can play with the compiler.
Standard project structure
For a CMake project, a standard project layout would be as follows. To prevent naming conflicts, a common practice is adding an extra directory so that we will include DgeX/DgeX.h instead of DgeX.h only.
1 | DungineX |
Then, in CMakeLists.txt, we can just add our source file and include directories.
1 | file(GLOB_RECURSE DGEX_SOURCES CONFIGURE_DEPENDS |
As for the target name {target_name}, there are some tricks here, and we will discuss that later.
Global macros
For a large project, especially for C/C++, there are often many useful macros defined globally. For example, we may want to be aware of the build type. Also, we may want a shortcut for namespace declaration. Finally, we can provide an API to get the version string.
1 | // debugging flag |
You can find more macro definitions in Defines.h.
Fun fact, the name Defines.h originally came from Westwood Studios’ C&C games.
Versioning
I’m not sure if you also feel this way, but adding version information into a project is super cool. To achieve this, we can add Version.h to our project. Also, you can use stringfy macros (defined in Utils/Macros.h) to get version as a string.
1 |
I learnt this style from spdlog. In fact, many of my CMake knowledge came from that, too.
Prepare to be a shared library (DLL)
Back in old days, we built standalone executable files (.exe). Then, we build static libraries (.lib) that linked directly into the executable file. Building static library is easy, as you don’t need to change anything.
However, things change when it comes to a dynamic library (.dll), or shared library. That’s why you often (or always) see some “weird” macro before each function in libraries you use. For example, this is one of the APIs in SDL3, with SDL_DECLSPEC macro.
1 | extern SDL_DECLSPEC int SDLCALL SDL_GetVersion(void); |
This is because, unlike static library which is linked with the target executable, shared library will be built into independent DLL file to be loaded at runtime. So, we have to tell the compiler and linker what function should be included in the DLL and how to load them.
If we have shared library in mind, it would be a bad idea to build only for static or dynamic. A good practice, as shown above, is use a macro. Below is the definition in DungineX, replacing SDL_DECLSPEC with DGEX_API. Note that we don’t need __declspec again in function definition.
1 | // Defines.h |
If we want to build DungineX as a shared library, we can just define DGEX_EXPORT, and everything else will be handled by the preprocessor.
However, this is not over yet. There is still one important configuration waiting for you, see Static or shared library
More about shared libary
For static library, since the compilation and linking are done at compile time, so you can write code normally as what you do. For shared libary, there is more “dirty work”.
When you build shared libary, in fact, you’ll get both a .lib and a .dll file. The .dll file is our actual library, and .lib here is for linking, telling the compiler which functions will eventually come from .dll. By this way, you can just write your code, and the compiler will generate the code to load functions from the shared library. If somehow the .lib is not available (e.g. close source library), then you have to manually write those boring code.
The client is the code that depends on the library. When it includes shared library’s header files, since we have the macro, it will not see __declspec(dllexport), and will eventually know that these functions should be imported via the corresponding .lib.
Another thing to notice is that, there are both __declspec(dllexport) for the libary and __declspec(dllimport) for the client. When you load a shared libary, there will be a table generated to map those function calls or data. __declspec(dllimport) explicitly specify the function or data to be loaded from a shared library, so that the compiler can generate more efficient code.
However, __declspec(dllimport) is not required for function, as the compiler will do the optimization anyway. The only case when it is useful is declaring variables, since we don’t want an indirect access for them. For more about this topic, you can check out the following links.
Eventhough we can export variable in a shared library, it is NOT recommended to do so, because you know, global variables are bad.
Update CMakeLists.txt
Now we have a minimum library project, let’s get ready to compile it.
Static or shared library?
Now that we have two possible targets, one static library and one shared library, we have to decide which one to build. Of course, we can build them all, but adding such an option would always be a better choice.
In DungineX/CMakeLists.txt, we can optionally add two targets, marked with SHARED and STATIC. Specially, for a shared library, we need to make it position-independent, so that any program can load it. Of course, we need to add that macro DGEX_EXPORT. For a static library, there’s nothing different from what you see before.
1 | set(TARGET_SHARED DgeX_Shared) |
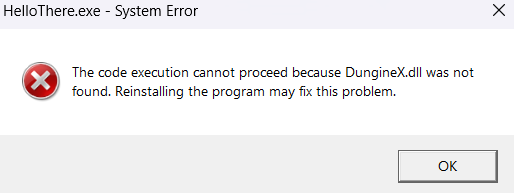
Now, you should have your shared library. But one thing may bother you, that the compiled DLL is output into its own directory, not beside the executable file. So, when you try to run your executable, you will see one of the most annoying errors on Windows.
One quick solution is to copy the DLL file. However, you can also set CMake’s output directory so that all binaries will be output to the same location. Here, DungineX only changes this if it is built as the main project, not a dependency. This allows more flexibility if it is built as a dependency.
1 | if(DGEX_MASTER_PROJECT) |
Target alias
It is good to have both static and shared libraries. However, it introduces another problem. When people link DungineX, which target should they use? With the CMakeLists.txt above, the users have to explicitly choose DgeX_Static or DgeX_Shared, which is apparently not friendly.
Fortunately, CMake supports target alias, and you’ve already seen it earlier when we were adding third-party libraries. We can create a consistent alias based on the user’s choice of library. This way, they can just use DgeX::Lib in their CMakeLists.txt.
1 | if(DGEX_USE_SHARED) |
However, you may encounter yet another problem, that you cannnot use target alias as target. So, you have to know the target behind the alias. This can be done via a simple function, and then you can use the original target name.
1 | # cmake/utils.cmake |
Ship DLL with your mark
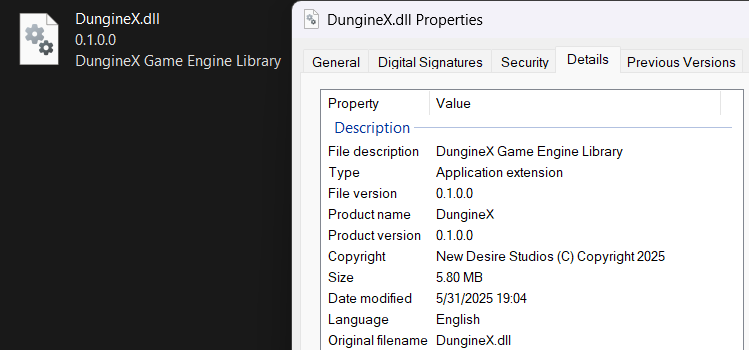
Now, you should have everything work just fine. However, if you are a perfectionist, you will probably get extremely frustrated as the output DLL file has no properties. This is not good, as players won’t be able to contribute to the one who writes the engine and makes the game happen.
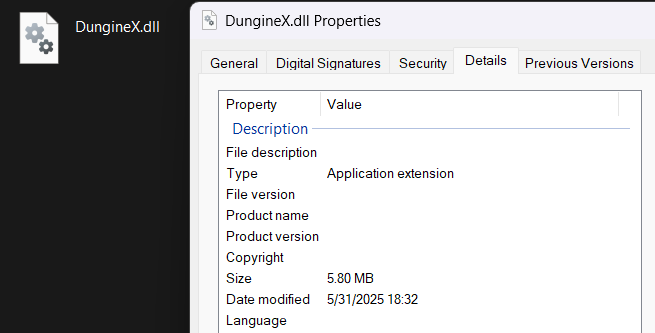
To add properties to your DLL file, there is a repo CMakeHelpers you can refer to. Just copy VersionInfo.in, VersionResource.rc and generate_product_version.cmake to your project and configure your information. See DungineX/CMakeLists.txt for detailed usage. Since DLL file usually don’t need an icon, so I removed ICON property. Finally, our DLL file will look like this. All of a sudden, it goes professional.
Of course, this works only on Windows. However, it is not a issue as we currently don’t target other platforms.
A Custom Entrypoint
对于游戏来说,初始化或者释放可能会很复杂,涉及窗口的创建、各种资源的加载,如果涉及 Windows 应用的创建,还需要将 main 替换为复杂的 WinMain。很多时候,我们没有必要将复杂度暴露给用户。因此,这里介绍一个相对特别的话题,就是为引擎添加一个自定义的入口,从而将很多逻辑转移到引擎内部。
这样做还有一个好处,就是可以向最终生成的游戏中添加一些有趣的东西,比如版权声明,启动画面等。
首先,我们可以创建这样的自定义入口,从而用户在使用引擎时,可以使用正常 main 的写法。
1 | typedef int (*DgeXEntryPoint)(int argc, char* argv[]); |
接下来,我们可以定义引擎 main 函数的实现,从而在用户入口的前后插入自定义的代码。
1 | extern DGEX_API int DgeXMainImpl(int argc, char* argv[], DgeXEntryPoint entryPoint); |
说到这里,突然想到这和面向切面编程(AOP)有些类似,刚好之前也写过一篇相关的文章,AOP in Spring Boot。
对于自定义入口,最关键的就是 main(或 WinMain,以下均用 main 代指)函数的定义。既然我们不希望用户手动实现这一函数,那么我们就需要通过某种方式提供给用户。main 与其他函数不同,其他函数可以只提供声名,然后在运行时从 DLL 中动态加载,而 main 为可执行程序的入口,因此必须在可执行文件内有定义。所以,解决方法就是将 main 函数实现在引擎的头文件中,当用户引入这一头文件时,即可引入 main 函数。而由于 main 函数只能定义一次,所以我们需要将其定义在一个单独的头文件中供用户引用,而不是我们的 DgeX.h。
具体地,我们这里将 main 函数定义在 DgeX/EntryPoint.h。目前的 main 函数实现还非常简单,只是调用一下刚刚的 DgeXMainImpl。由于 DgeXMainImpl 就不是 main 了,所以它可以只提供声明,而将实现放在源文件中。当然需要注意,在我们引擎内部引用 EntryPoint.h 时,就不能再包含 main 函数的定义了,具体可以通过特定的宏开关实现。
1 |
|
之后,随着引擎功能逐渐复杂,我们会在 DgeXMainImpl 中添加更多的内容。当然,为了提供更一致的体验,我们还可以将 DgeXMain 进一步变成 main。因为预处理发生在编译前,所以不会对编译过程造成影响。
1 |
最后,用户只需要在原先要包含 main 函数源文件中,引入 EntryPoint.h 即可。下面是一个简单的示例,具体见 Demo/HelloThere/Main.cpp。
1 |
|
What’s Next?
现在我们已经有了一个不错的项目结构了,接下来就可以向其中添加各个模块了。在进行下一步之前,我们有必要做一些规划,也就是我们的引擎主要分为那几个部分。
Device
首先,自然是设备相关,包括图形设备(Graphics)、音频设备(Autdio)、输入设备(Input)三类。这一层主要对硬件设备进行封装,提供统一的抽象模型。当然,如果我们使用 SDL,和硬件相关的部分其实已经封装好了,不过我们还需要根据引擎具体的需求进行二次封装。
这一部分是整个游戏引擎的基础设施(Infrastructure),在它完成之后,其他所有模块将不再需要调用底层 SDL 和其他库的接口,所以非常关键。
Resource
资源管理也是游戏引擎中一个重要的部分。游戏中通常需要加载大量的资源,硬编码自然不是一个好的选择,因此我们需要有一个统一的资源管理模块。
首先一个问题,是资源的索引,可以使用 XML 或者 JSON 格式的文本,记录资源 ID 和文件索引,这个很容易,只要准确地描述资源的各种属性即可。
第二个问题,也是更关键的问题,如何加载资源。由于资源种类很多,而且很大程度上依赖于特定的游戏,因此我们在引擎层很难有全面的支持,因此就需要考虑可扩展性。例如,在引擎里,我们可以提供最简单的文本、图片和声音资源,然后允许客户端定义新的资源类型以及加载方式。
此外,还有一些琐碎的问题,比如动态添加或修改资源、资源何时加载和释放等,这个在之后具体设计时再考虑。
当然,如果想保护游戏资源,也可以选择对资源文件进行加密。这实现起来不难,也不是我们关注的重点。
Scene
接下来,就是游戏引擎的重头戏,场景管理。在这一部分,我们要管理游戏对象,实现游戏对象的更新、绘制,以及它们之间的交互。
对于这一部分,游戏开发中有一个非常受欢迎的实现方式,就是 ECS(Entity Component System)。这个其实在之前的 Dungine 中就已经有所实践了,能够提供非常高的灵活性。在 DungineX 中,我们也继续使用这一模式。
曾经在 Dungine 中,我实现了非常简单的 2D 碰撞检测,然而并不是真正的物理模拟。因此,这次我想为引擎引入完整的物理系统。之前还想亲自实现物理引擎,但是实在过于艰深晦涩,我只勉强实现了粒子物理系统。由于物理引擎实在过于宏大,因此我们暂时直接使用第三方库。
此外,我们也可以在引擎层面添加一些额外的功能,比如观察者模式、原型模式、单例模式等的支持,以及对象池等等。
Application
对于一个完整的游戏,不只有游戏画面,还有各种菜单界面。虽然可能已经超出了引擎的基本功能范围,但是我们可以为用户提供简单的界面支持。
这个可能是我个人的一些执念吧,比较想实现界面的切换效果。此外,还想提供一个基于 XML 的界面编写支持,有些类似 HTML 或 WPF 的感觉。属于额外的功能支持吧。
在界面支持的基础上,我们可以把整个游戏封装成一个 Application,从而管理整个游戏的执行流程。
Logs
此外,其实还有很多比较零碎的点,比如日志支持等,这些会在之后的内容中穿插介绍。
预告
在下一章中,我们将实现最基本的窗口创建,以及图形绘制,也就是 Device 中的 Graphics 部分。ᓚᘏᗢ