Demystifying NAT in P2P
“И ещё не раз кляня судьбу,
Вспомнишь ты Призрака мольбу!”
— Призрак Оперы
Prologue
Ahoy. It’s been quite a few days since the last post. I could have written more, but I’m not content of poor quality articles that are more like walkthroughs.
Recently, I come across, again, P2P gaming issues, which is really frustrating. The root cause of this is NAT. Instead of searching just for solutions, maybe it’s time to take a look at this trouble maker. So in this post, I’ll first talk about NAT, then share two ways to enjoy P2P games under bad NAT situation. Finally, I’ll try it out on my favorite game — Command & Conquer 3: Kane’s Wrath.
References
Thanks for all these wonderful articles!
- Network address translation
- NAT Types and NAT Traversal
- Understanding Different NAT Types and Hole-Punching
- Proxy vs VPN: What are the main differences?
- Zerotier组网之自建Moon加速节点
- How to Set Up a VPN on VPS Server: A Step-by-Step Guide
NAT
So, first, let’s talk about NAT. I’ll explain common types of NAT, and for today’s topic, how it impacts our gaming experience.
What is NAT
Today, the most common protocol for internet communication is TCP/IP. As TCP/IP protocol communicates via IP, in order to get in touch with worldwide users freely, one must have a public IP. However, as most programs still use IPv4, and the number of IPv4 addresses is limited, most of us are in fact, sitting in a private network, and apparently, not having a public IP.
In this case, how can we communicate with the outside world? This is where NAT comes in. NAT, a.k.a. Network Address Translation, is a method of mapping a private IP address to a public one, and vice versa. A private network must have at least one router with a public IP, so that it can communicate with the outside world on our behalf. And this router is called NAT router.
When a packet is sent from a private network to the outside world, the NAT router will replace the source IP address with its own public IP address, and record the mapping in a table. When a packet comes back, it will check the destination IP address, and if it matches its own public IP, it will look up the table, and replace the destination IP address with the original private one, and send it to client.
This is how NAT works. However, this is not the end of the story. NAT routers can be configured in different ways, and this leads to different types of NAT. And some of them are not friendly for P2P gaming.
Different Types of NAT
There are more types of NAT, but the most common ones are:
- Full Cone NAT
- (Address) Restricted Cone NAT
- Port Restricted Cone NAT
- Symmetric NAT
They are defined by how they handle incoming packets, and how they map the private IP address to the public one. Before we move on, there are some terms you need to know.
The communication of TCP/IP is between pairs of IP address and port. For us who sits behind a NAT router, let’s say we have internal IP address and port (iAddr:iPort). Our hard-working NAT router, will translate it into external IP address and port (eAddr:ePort). And finally, the target IP address and port is (hAddr:hPort), we call it the host. For now, we consider host to be a public server with, of course, a public IP.
The notation I used here is taken from Network address translation. The descriptions and figures also come from this wiki.
In this process, the source and destination address for TCP/IP is as follows:
1 | 1 [Client] iAddr:iPort -> hAddr:hPort |
The differences between each type of NAT is how they handle the mapping. Usually the NAT is managed by your ISP (Internet Service Provider). Based on my experience, for home and organization, you may have Port Restricted Cone. And the mobile network, like 4G or 5G, is most likely to be Symmetric NAT.
Full Cone NAT
This is the most basic type of NAT, also the most permissive.
- Once an internal address (iAddr:iPort) is mapped to an external address (eAddr:ePort), any packets from (iAddr:iPort) are sent through (eAddr:ePort).
- Any external host can send packets to (iAddr:iPort) by sending packets to eAddr:ePort.
See the figure below. Once the mapping is created, it will never change, unless the router flushes the mapping. One client, one port, many hosts, doesn’t it look like a cone?

Each half-circle represents a port, and the same IP with different port with be treated as different address.
In this case, as shown in the figure. Even if Client has never sent any request to Server 2, Server 2 can send something to Client if Server 1 kindly tells him the eAddr:ePort of Client. But if the mapping [iAddr:iPort, eAddr:ePort] does not exists yet, no one can find Client.
(Address) Restricted Cone NAT
You may find that Full Cone NAT is a little too permissive, so people put some restrictions to it.
- Once an internal address (iAddr:iPort) is mapped to an external address (eAddr:ePort), any packets from (iAddr:iPort) are sent through (eAddr:ePort).
- An external host (hAddr:any) can send packets to (iAddr:iPort) by sending packets to (eAddr:ePort) only if (iAddr:iPort) has previously sent a packet to (hAddr:any). Any means the port number doesn’t matter.
Since Restricted Cone is still Cone, so they are essentially the same. The difference is that Restricted Cone NAT will check incoming requests. It achieves this with an extra mapping of [iAddr:iPort, hAddr]. First, it will resolve [iAddr:iPort] just like Full Cone NAT. Then it checks if [iAddr:iPort, hAddr] exists. If not, it will refuse the connection.

Port Restricted Cone NAT
This is actually the same as Restricted Cone NAT, just the extra mapping also includes port, i.e. [iAddr:iPort, hAddr:hPort]
- Once an internal address (iAddr:iPort) is mapped to an external address (eAddr:ePort), any packets from (iAddr:iPort) are sent through (eAddr:ePort).
- An external host (hAddr:hPort) can send packets to (iAddr:iPort) by sending packets to (eAddr:ePort) only if (iAddr:iPort) has previously sent a packet to (hAddr:hPort).

Symmetric NAT
The first three cone NATs, are all permissive, as long as you know Client’s (eAddr:ePort) and it has sent you something before, you can establish a connection. But, things change for Symmetric NAT.
- The combination of one internal IP address and a destination IP address and port is mapped to a single unique external source IP address and port; if the same internal host sends a packet even with the same source address and port but to a different destination, a different mapping is used.
- Only an external host that receives a packet from an internal host can send a packet back.
The description may not be clear enough. Check the figure instead. Now, the eAddr:ePort is no longer fixed. Symmetric NAT ensures that every (iAddr:iPort, hAddr:hPort) has a different (eAddr:ePort). So even if Server 2 knows (eAddr:ePort) from Server 1, it is unable to establish a connection with Client.

Unlike Cone ones, Symmetric NAT maintains a one-to-one relation between iAddr:iPort and hAddr:hPort, and it is why this type of NAT is named “Symmetric”.
You may complain about such strict limits, but it does improves security, as not everyone can access your private address. But Port Restricted Cone can also do it, why bother making it Symmetric? Referring to What’s the advantage of symmetric NAT (as far as ISP is concerned)?, Symmetric NAT is easier to maintain. It does have a point, as all connections are unique, so the router only need to lookup the mapping once, while Port Restricted Cone has to check prior records.
NAT Traversal
Just now, we assume the host to be a public server, it can be webpages we visit everyday. Then it comes the question, can we communicate with someone who is also behind a NAT router?
If you are in the same private network, i.e. under the same router, the answer is definitely yes. It is just LAN, Local Area Network, it is meant to be interconnective. The real challenge is, how to communicate with someone in another LAN.
In order to expose a private host, making it connectable from the outside world, we have, the “infamous” NAT Traversal. You may be more familiar with its alias, Hole Punching. This technique allows a private address to be located just like a public one. How is it possible?
First, let’s take Full Cone as example. We know that, the mapping will never change after creation. Since eAddr is a public IP, we can use eAddr:ePort, to access iAddr:iPort. We did it! Just one annoying problem, that you are not able to customize eAddr:ePort like what you can do with a real public address. Since the NAT router’s IP is unlikely to change and it may not flush the mapping often, the connection should be stable for quite a while.
The other two Cone NATs, as iAddr:iPort and eAddr:ePort is also bind together, can do it too, but only one hAddr:hPort (hAddr:any for Restricted Cone NAT) can access the exposed eAddr:ePort.
However, Symmetric NAT won’t be so lucky. As eAddr:ePort changes, it is impossible to establish a stable connection with private devices without some help.
How NAT Impact P2P
P2P, a.k.a. Peer-to-Peer, enables direct communication between two private devices. It is commonly used for gaming. The benefit of P2P is that it doesn’t require a central server for multiplayer game, where the player’s computer acts as the server. Even if there is a central server, it doesn’t require intensive computation.
Let’s consider the situation where there are two players. If both of them are lucky to have public IPs, things would be much easier as they can naturally connect with each other. If some one is behind a NAT, then things become tricky.
Here is a figure from Understanding Different NAT Types and Hole-Punching, showing connectivity of two devices under different NAT.
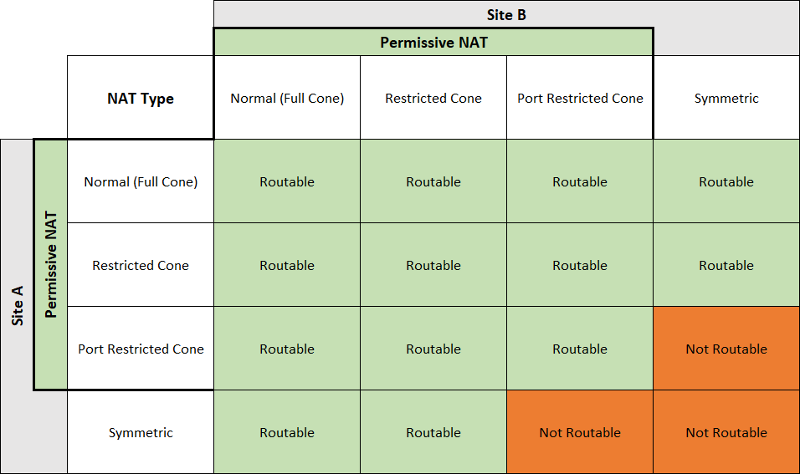
P2P connection cannot be established with players alone, as two private devices are no way getting each other’s information. So usually an intermediate software helps in the establishment process. And once establishment completes, the players can communicate with each other directly.
Actually, if one of them has public IP or is under Full Cone NAT, they can achieve P2P without any help. Just let the other one know their address, and the problem solves. As long as one way connection establishes, P2P can work.
Establishing A P2P Connection
So how does a P2P connection establishes?
First, let’s talk about P2P among Cones. You can see in the previous figure that they are all routable. So first, two players send a request to the intermediate server, so that the server knows their eAddr:ePort. Then the server can tell each player the other’s address, so that connection establishes. Since the mapping of iAddr:iPort and eAddr:ePort never (at least for long enough) changes, players are sure to find each other. Although the first request may fail, as Restricted Cone only allow incoming requests when there are outcoming ones before, the following requests can work. This process is usually called handshake.
Now, what about the Symmetric NAT? Since it will change ePort for different connection, only eAddr the server acquires is valid. So the actual request sending from the player behinds Symmetric NAT to the other player has a different, and is unknown ePort. So the counterpart must be Full Cone or Address Restricted Cone to accept the new port, and let Symmetric NAT find it first.
The intermediate server here is called STUN (Session Traversal Utilities for NAT), this is lightweight, and the server only helps in establishing the connection, and is not involved in the data transferring later.
If both players are behind Symmetric NAT, or Port Restricted Cone meets Symmetric NAT, then unfortunately, STUN is not enough. In this case, TURN (Traversal Using Relays around NAT) is required. TURN resolves this issue by relaying all requests, therefore it is resource intensive. However, for gaming, the communication overhead is usually insignificant, so it can be a solution.
Well, there is one possibility though, for Port Restricted Cone and Symmetric NAT. If somehow you can guess the new port right, then yes, the connection is OK. But this is not practical, as there would be too many ports. It would be even harder to guess two ports if both are behind Symmetric NAT.
TURN server is not that common, so if unfortunately there is Symmetric NAT among players, you can try another approach — VPN.
VPN
Speaking of VPN, what is the first thing coming into your mind? Bypassing some restriction, or access some private resources?
What is VPN
VPN stands for Virtual Private Network. It works by creating a virtual network under the VPN server, and allow users in this virtual network to connect with other networks. It’s quite like a Full Cone NAT, where the “NAT router” is now the VPN server. NAT traversal is still needed, but this time the host is the VPN server, so it doesn’t matter what types of NAT you are behind.
The primary goal of VPN is not for P2P connection, though. VPN is meant to create secure connections by hiding your IP and encrypting your network activity, and allow access for specific resources. Without a VPN, you connect with the outside world via the NAT router. Depending on your ISP, this NAT router may be poisoned. It may ban you from access certain resources on the Internet, or monitor your activity. (Or using Symmetric NAT to prevent you from P2P) Once the VPN connection is established, the client can access resources provided by the VPN server. And since the actual request is delegated to the VPN server with encryption, so your IP and network activity remains unknown to others, even your ISP.
However, VPN is virtual, which means it is not real. The actual packages still traverse through your NAT to/from the VPN server, so the ISP knows that you are communicating with a VPN server. But since the packages are encrypted, the ISP does not know what you are doing, making it secure.
How VPN Makes P2P Possible
Although VPN is a virtual network, which won’t changes your NAT situation, but it brings you and your friends into the same network. So that you and your friend can play in LAN mode, if both of you join the same VPN server. However, this is not real P2P, as requests are relayed by the VPN server, and all data is encrypted. So the connection may not be as fast as P2P via STUN. But it solves the Symmetric NAT problem.
Another bonus for using VPN is that, you can acquire a public IP. Like we talked about earlier, VPN also use NAT to manage the virtual network, so you will have a public address from the VPN. This way, you can play the Online mode with players behind other networks.
VPN or Proxy
If you have previous experience using proxy server, you may wonder the differences between these to terms. To put it simple, they work the same, except that VPN provides encryption while proxy does not. For proxy, you are only invisible to the internet, and all your activity is still monitored by the ISP. Also, proxy does not create a virtual network.

For more details, you can refer to Proxy vs VPN: What are the main differences?.
Virtual LAN with Zerotier
If you just want connectivity with known devices, you can put them in a LAN. For devices in different areas, we can utilize tools like Zerotier to create a virtual LAN, a.k.a. VLAN.
Setting Up VLAN
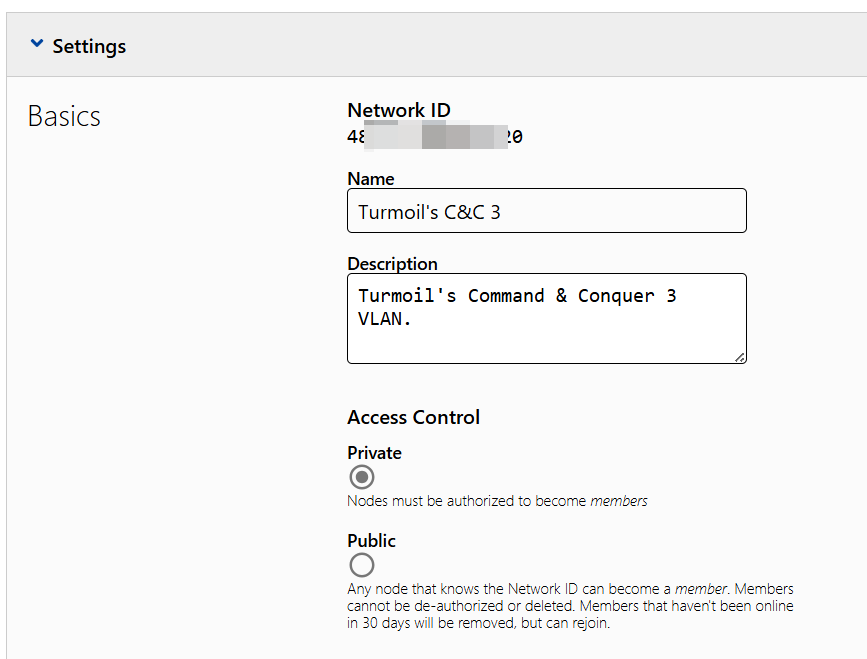
The instructions on Zerotier’s website are quite clear, register an account and you are ready to create your network. Free plan allow a maximum of 25 devices in a network, which is sufficient in most cases. In the dashboard, you can get the network ID to join later. And I recommend you set it to private to prevent unwanted access. Later, in IPv4 Auto-Assign section, you can pick your preferred range.
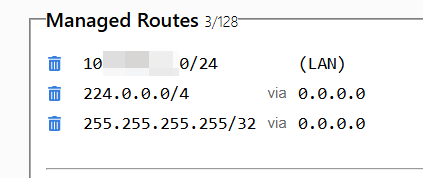
If you want to enable broadcast and muti-cast, you can add routes 255.255.255.255/32 and 224.0.0.0/4. This is usually needed by P2P games for player discovering.
Now, the network is set, and you can join it on your devices.
Joining VLAN
Download Zerotier client here. You can find it in the system tray. Click “Join New Network…”, and enter the network ID.
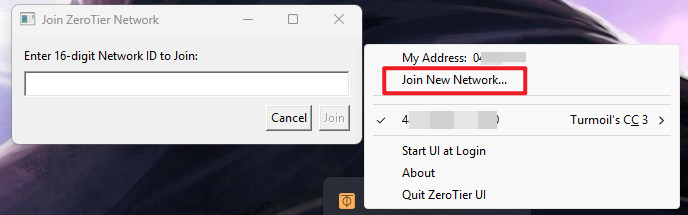
If you set your network private, you need to approve it in the network dashboard. You can also find the assigned IP there. On your PC, you can check the assigned IP using ipconfig command. You can find an ethernet adapter called Zerotier One.
1 | Ethernet adapter ZeroTier One [4***********0]: |
Now, you are in the VLAN. If you have other devices in it, you can communicate with them.
Launching the Moon
Zerotier achieves VLAN using NAT Traversal as we mentioned before to achieve P2P connection. So it also faces the routing problem. In case you have Symmetric NAT, Zerotier will relay the requests to ensure connectivity. It is nice of Zerotier to provide relay service, but the relay server is not reliable for free users. If you want stable connection, you can set up your own relay server.
Zerotier is really good at naming. It’s own server is called planet, and self-hosted ones are called moon.
Install Zerotier
Before you start, you need to allow UDP 9993 on your server, which is used by Zerotier.
First, install Zerotier on your server. The script is smart and will handle everything for you. By the way, all commands of Zerotier require sudo.
1 | curl -s https://install.zerotier.com/ | sudo bash |
Then, you can check the server’s status.
1 | sudo zerotier-cli info |
If everything is fine, you can get the following response. The third column is node ID, which will be used later.
1 | 200 info 92******65 1.14.2 ONLINE |
If the status is not ONLINE, you can refer to Troubleshoot for solution.
Configure Moon
Now, we will convert the Zerotier node on the server into a Moon.
First, we need to get a initial configuration file, which is the identity of the node.
1 | sudo zerotier-idtool initmoon /var/lib/zerotier-one/identity.public > moon.json |
Open moon.json, add your server’s public IP as a stable endpoint.
1 | { |
Then, we can generate the final configuration using this moon.json.
1 | sudo zerotier-idtool genmoon moon.json |
It will generate a *.moon file. Copy it to /var/lib/zerotier-one/moons.d/.
1 | sudo mkdir -p /var/lib/zerotier-one/moons.d/ |
Now, restart Zerotier service, and the configuration is done.
1 | sudo systemctl restart zerotier-one.service |
Orbiting Around the Moon
The moon does not have to be a node in the VLAN. We just need to orbit around it. In each node in the VLAN, run the following command to add the Moon. The <moon id> is what you get via zerotier-cli info on the server.
1 | zerotier-cli orbit <moon id> <moon id> |
If everything is OK, it will return 200 orbit OK. Wait a few seconds, and you can use zerotier-cli listmoons to see it. You can also see it using zerotier-cli listpeers with role as MOON. To deorbit a moon, you can use zerotier-cli deorbit <moon-id>.
All Zerotier commands require administrative privileges. On Windows, you can use sudo, which is added in Windows 11. Or press Win + X to run terminal as Administrator.
Congratulations, you now have a low-ping VLAN ready to go!
Zerotier Troubleshoot
If the status is TUNNELED instead of ONLINE, it is probably that the node is not able to connect the planet server. Check if UDP 9993 is allowed. If UFW is enabled, you can allow it with the following command.
1 | sudo ufw allow 9993/udp |
Then, restart Zerotier service.
1 | sudo systemctl restart zerotier |
Now, check again, it should be ONLINE.
VPN with OpenVPN
Zerotier is essentially a networking utility that helps you better manage virtual network. If you want to use it for communicating with other networks, you have to configure routers within the created virtual LAN. In this case, setting up a VPN could be a better choice.
Well, to setup your own VPN, you need a public server. It is quite easy to get one nowadays. You can purchase a ECS or VPS, or use some free ones.
Of course, you can buy VPN services from those companies. But they are usually expensive, and may not be legal in some countries as they provide access for forbidden resources. In this case, getting your own VPN server could be an alternative. For personal use, OpenVPN is a perfect solution, as it is opensource and free.
Install OpenVPN Server
First, get the OpenVPN installer script. See openvpn-install for more details. https://git.io/vpn is merely a shortcut for the openvpn-install.sh in the master branch.
1 | wget https://git.io/vpn -O openvpn-install.sh |
If your server has connection issues with GitHub, see Troubleshoot for workarounds.
Then, execute the installer. It requires sudo.
1 | sudo bash openvpn-install.sh |
It will ask you the following questions. You can choose default values, but I recommend you change the default port.
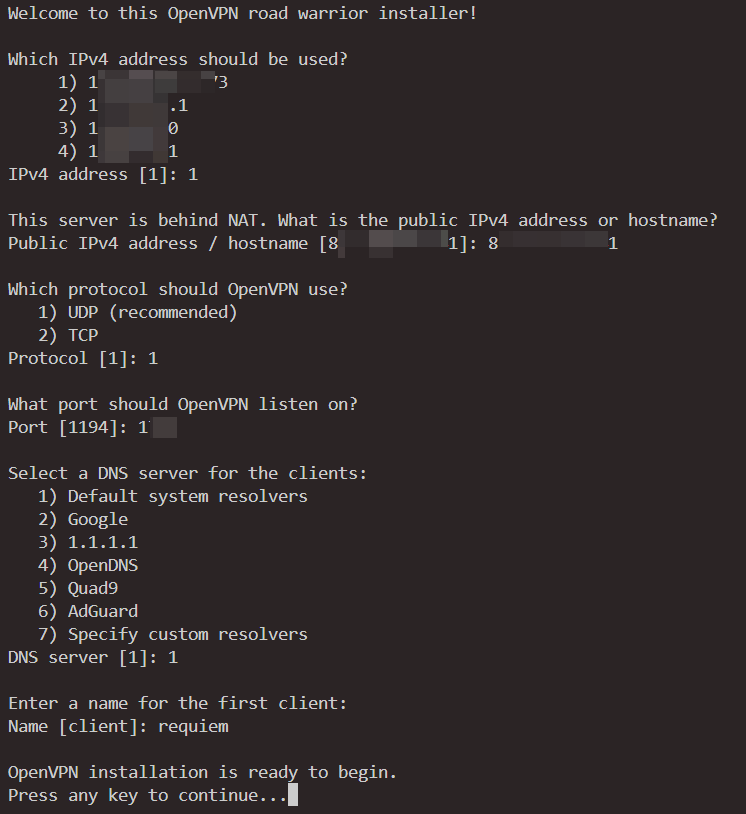
Remember to open the port to allow UDP on your server provider’s dashboard. Also you may need to use ufw to open the port.
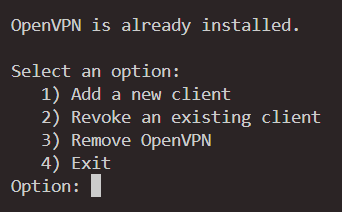
If nothing goes wrong, you’ll see the client creation that ended with “Finished!”. And you will get a file with extension ovpn. Later, when you want to add new users, just execute openvpn-install.sh again, and you will have the options.
Good, you now have your own VPN server.
Install OpenVPN Client
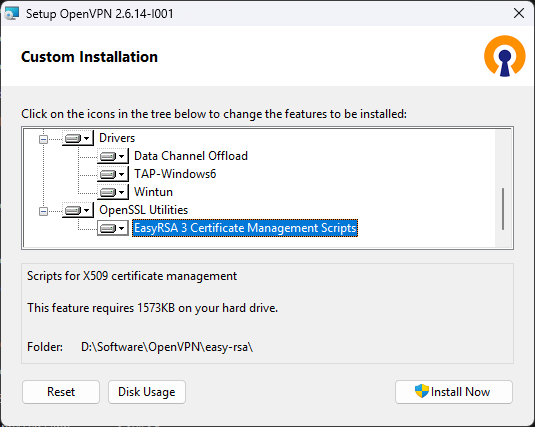
Now, you need the VPN client on your PC. You can get the installer at Community Downloads. Remember to tick OpenSSL Utilities on installation.
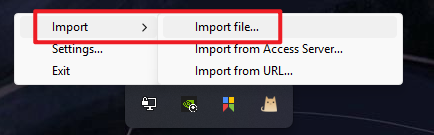
On your first launch, you may see a dialog saying no config file found. Of course, you have to import one. Download the ovpn file you get on your server, and import it. You can find it in the system tray.
After importing the configuration, you can connect with the VPN server. Now, you can use websites like ShowMyIP to check if your IP really changes or not.
OpenVPN Troubleshoot
Utilizing our knowledge, you can use existing proxy or VPN on your own PC to download the stuffs, then transfer them to your server. However, when you executing the installer, you may still get stuck. It is because inside the installer, it requests EasyRSA, which is also on GitHub. So you may have to modify the script.
Open openvpn-installer.sh, find easy_rsa_url. You can see that it fetches EasyRSA-3.2.2.
1 | easy_rsa_url='https://github.com/OpenVPN/easy-rsa/releases/download/v3.2.2/EasyRSA-3.2.2.tgz' |
Instead of requesting it, you can manually download it and put it somewhere. Comment out wget and goes directly to extract.
1 | easy_rsa_url='https://github.com/OpenVPN/easy-rsa/releases/download/v3.2.2/EasyRSA-3.2.2.tgz' |
Now, there should be no more network issues.
Have Fun🎉
Now, we know what’s going on with NAT, it’s time for gaming!🎮
Take Command & Conque 3: Kane’s Wrath as an example. It is a classic RTS game with P2P for multiplayer. As we know, P2P require NAT Traversal, or Hole Punching, which can be a problem if players are in different networks. Especially after the shutdown of GameSpy.
Luckily, there is other services to keep P2P games. One of them is GameRanger. It configures NAT Traversal using STUN so that you can play in LAN. But since it uses STUN, it fails if one of you is behind Symmetric NAT and the other is not Full Cone or (Address) Restricted Cone. It is suitable for close friends, as it doesn’t have lobby, which means you have to call your friends in real life.
The other is C&C:Online supported by Revora, the substitution of GameSpy, allowing you to play Online with players all over the world. So now you should realize, it requires public IP to play online. So you should either have one, or use VPN.
Here, with all we gathered earlier, I present you two methods, and it should work for all P2P games.
If you feel OK to play in LAN, you can simply use GameRanger. It is easy to use, no configuration required. However, if you encounter Symmetric NAT, you can setup Zerotier for relaying. Of course, using VPN can also allow you to play in LAN, as long as you and your friends connect to the same VPN server.
However, if you want to play Online, you have to use VPN. And to ensure a more stable connection, you should better have a static public IP. If you set up your own VPN server, then of course, your public IP is fixed. But if you purchase VPN services, you may check if they have this option.
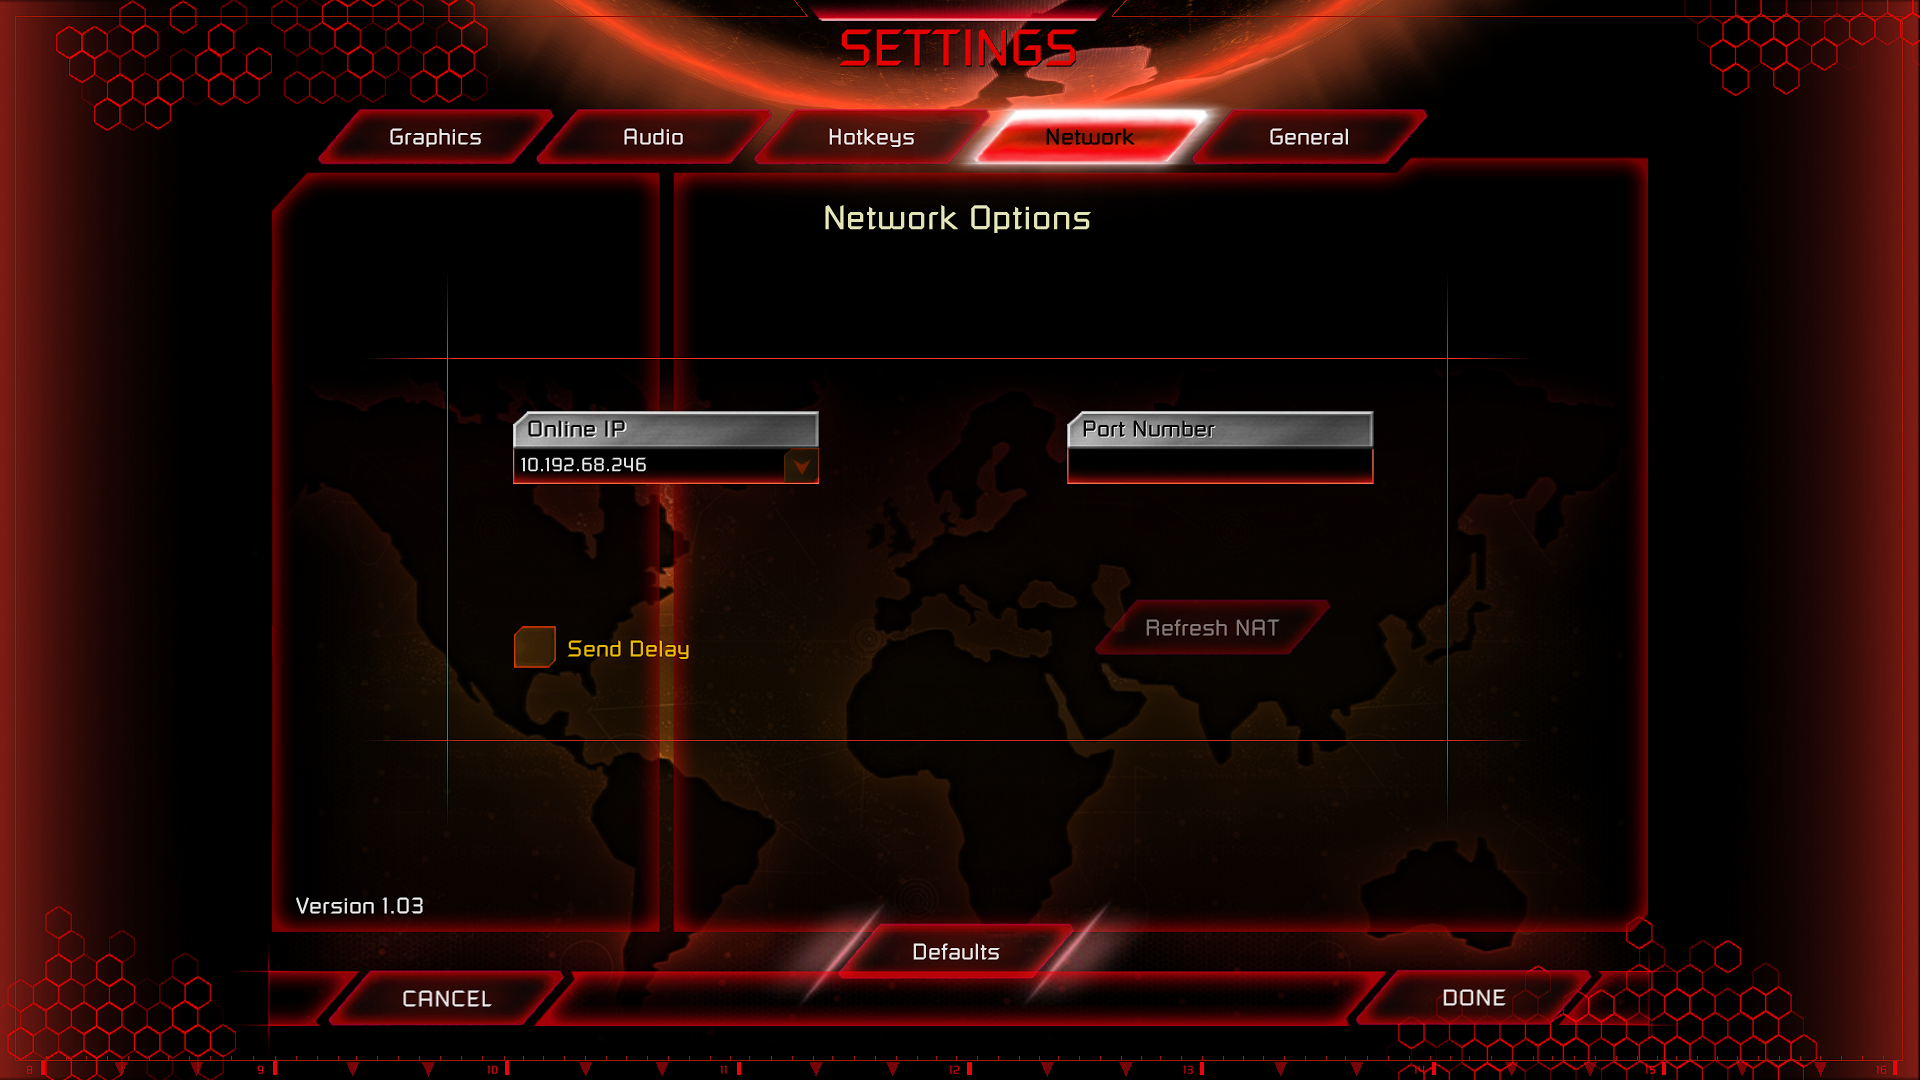
Whether you use Zerotier or VPN, you need to change the Online IP in Settings to the assigned IP in the virtual network. Then, you can just go LAN or Online.
Play with Zerotier
To just play in LAN, you can use Zerotier. All players should have Zerotier client, and join the same VLAN. If you have self-hosted moon, then all players should add it. See Orbiting Around the Moon. Then, just open the game and play in LAN.
If you are unable to see your friends in the lobby, you probably forgot to allow broadcast in your network. See Setting Up VLAN to add broadcast routes.
A notable issue for Kane’s Wrath is that, the game is buggy for Network games. It will always choose the “smallest” IP address available, regardless of the Online IP you select in Network Options. So in order to let the game choose the correct IP, you need to ensure the IPs in the IPv4 Auto-Assign range you selected are smaller than your other IPs.
When I say “smallest”, I mean, the smallest. Just compare each part from left to right. Or, for Kane’s Wrath, the first in your Online IP list.
Play with VPN
Of course, you can setup your own VPN server. You can add more accounts for your friends so they can connect to your VPN server to play in LAN. But for those who don’t have a public server, using the default server provided by Command Post can be an alternative. But not all games have this convenience.

Of course, self-hosted VPN can be faster. Also, you can play Online with your own VPN server.
Epilogue
Isn’t it great to be able to play P2P games? But the point is that, we now know what is going on, instead of just complaining about the NAT. It’s been about two years since I first encountered this problem, and now, finally, the problem is resolved. Good luck, have fun!ᓚᘏᗢ